Posts filed under 'Dicas'
For a long time I’ve been looking for a fast way to lock up my OSX screen, preferably using keyboard shortcuts so I don’t have to waste time looking for and then clicking at the “Login Window…” option. This was the only way I knew to lock my computer so people couldn’t mess with it while I’m out.
Humberto has found a way to do it using the Hot Corners + Screen Saver asking for password. It seemed nice, but I still wanted do it without having to use the mouse at all.
That’s when I tought about QuickSilver, which is not 42 but is prety close to “The Answer to Life, the Universe, and Everything”
Using Humberto’s idea of the ScreenSaver prompting for the password, I’ve googled around and found out “but she’s a girl” blog, wich describes almost what I wanted, using QuickSilver triggers but still required a click on a hot corner.
So I came out with a mix of these two, wich is:
- Using Password Protected Screen Savers
- Activate the Screen Saver using QuickSilver Triggers
- Set up the trigger to a keyboard shortcut only, with no need for the mouse at all
Here are the Steps:
Set your OSX to ask for your password after coming back from the Screen Saver. Check out Humberto’s post about that.
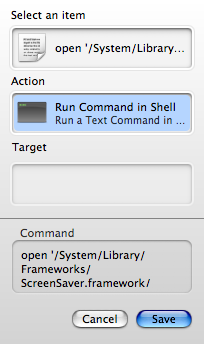
Create a trigger on QuickSilver:
- Open QuickSilver Preferences
- Create a new HotKey trigger and double click it
- Insert the command below in the Item box, remember to type a “.” before you paste it, otherwise QuickSilver will perform a search.
/System/Library/Frameworks/ScreenSaver.framework/Resources/ScreenSaverEngine.app/Contents/MacOS/ScreenSaverEngineWell
- Press Tab and type “Run Command in Shell in the Action box
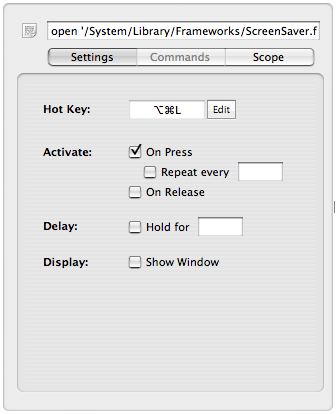
- Save and click on Info
- Click on the Hotkey box and then set your preferred shortcut for activating the Screen Saver, in my case it is ⌘L
Enjoy it 
November 9th, 2006
Uma coisa interessante do iCal é ele permitir enviar um e-mail como uma das opções de alarme. O detalhe é que esse e-mail por padrão só pode ser enviado para você mesmo como um lembrete, já que você é o dono do calendário
No meu caso eu estava precisando mandar um aviso todo mês para uma outra pessoa, lembrando-a de fazer um depósito na minha conta.
O evento já estava configurado no meu iCal para se repetir todo mês no mesmo dia durante um período determinado. Para que o e-mail fosse enviado automaticamente, criei um Workflow no Automator.
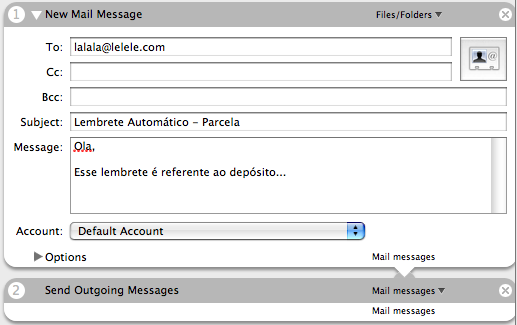
O macete vem agora, que é salvar o Workflow como plugin do iCal.

Depois disso é só ir no iCal, escolher o evento, clicar em Info, Alarm, OpenFile. O script que você criou já vai aparecer na lista.
October 31st, 2006
This is the best answer I got:
“The Mac mini’s input is a line-level input, whereas the mic line on most analog headsets needs a mic-level input (to power the mic). The mini isn’t giving the mic any power, so it’s not going to work.
You need something to pull the level of that mic line up to what’s known as “line level.” A lot of people use the iMic, others use audio mixers that will provide power to the mic (and other inputs) while providing a line-level output for the mini to accept.
Alternatively, you can pick up an inexpensive USB headset. Logitech and Plantronics both make very affordable USB-based solutions.
Hope this helps.”
Chris Brightwell
http://forums.macrumors.com/archive/index.php/t-187096.html
October 8th, 2006
Assim que comecei a usar o Mail não gostei do fato da busca, apesar de absurdamente rápida, só funcionar na caixa postal atual. Me dei ao trabalho de ler o Help e descobri que assim que é feita uma busca aparece uma barra com as opções da mesma, e a primeira opção é “All Mailboxes”. Essa barra também permite definir se a busca será feita na msg inteira ou só em um cabeçalho específico. Uma vez selecionada uma opção ela fica como padrão para todas as buscas futuras.

October 3rd, 2006
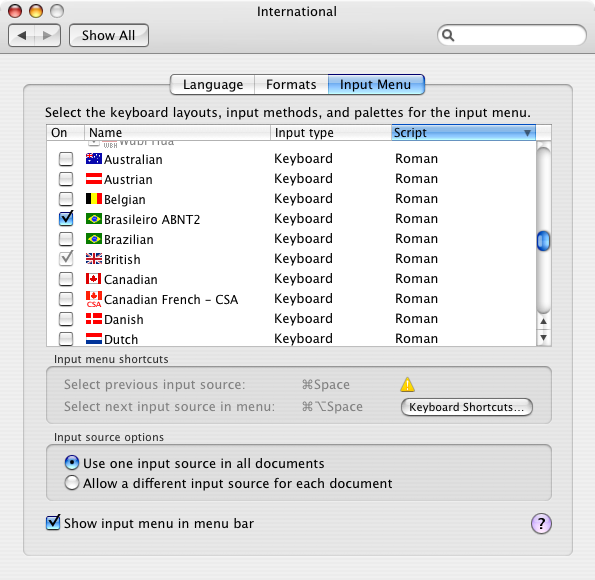
Se é para o bem de todos e felicidade geral da nação, deixo aqui disponível o layout de teclado ABNT2 para o MacOSX. Passei uma semana pesquisando e só achava links para um arquivo na unicamp que não existe mais, até que eu achei esse e desde então tenho a felicidade de poder escrever com acentos, cedilhas e outros adereços (ºª§¨).
Para instalar basta colocar o arquivo na pasta Library/Keyboard Layouts, efetuar Logoff ou reiniciar a máquina e selecionar o novo layout.
UPDATE:
Esqueçam esse Layout, Acácio fez os bundles decentes dos layouts ABNT2 e US-International que não dependem de nenhum outro layout de teclado e funcionam em qualquer aplicação. Baixem direto do
acacioas blog.
September 20th, 2006
Next Posts
Previous Posts